|
Size: 2149
Comment:
|
Size: 2177
Comment:
|
| Deletions are marked like this. | Additions are marked like this. |
| Line 2: | Line 2: |
| 1. Download the SecureW2 installer from: | 1. Download the SecureW2 installer from: |
| Line 8: | Line 8: |
| {{attachment:graphics37.png}} | {{attachment:securew2_reboot.png}} |
| Line 12: | Line 12: |
| 1. Go to the network properties and right-click on '''Wireless Networks''' (where you also choose properties). | 1. Go to the network properties and right-click on '''Wireless Networks''' (where you also choose properties). |
| Line 14: | Line 14: |
| {{attachment:graphics38.png}} | {{attachment:securew2_wireless_setup.png}} |
| Line 19: | Line 19: |
| {{attachment:graphics39.png}} | {{attachment:securew2_wpa.png}} |
| Line 22: | Line 22: |
| {{attachment:graphics40.png}} | {{attachment:secure_eap.png}} |
| Line 26: | Line 26: |
| {{attachment:graphics41.png}} | {{attachment:securew2_user.png}} |
| Line 28: | Line 28: |
| 1. Select a meaningful profile name (preferably '''eduroam''') and set your outer identity in the form yourname@yourrealm. | 1. Select a meaningful profile name (preferably '''eduroam''') and set your outer identity in the form yourname@yourrealm. |
| Line 31: | Line 31: |
| 1. Check the '''Verify server certificate''' checkbox and add the certificates from your ca. | 1. Check the '''Verify server certificate''' checkbox and add the certificates from your ca. |
| Line 33: | Line 33: |
| {{attachment:graphics42.png}} | {{attachment:securew2_ca.png}} |
| Line 35: | Line 35: |
| 1. Click the '''Authentication''' tab and verify that '''Authentication Method''' is set to '''pap''' | 1. Click the '''Authentication''' tab and verify that '''Authentication Method''' is set to '''pap''' |
| Line 37: | Line 37: |
| 1. {{attachment:graphics43.png}} Enter your username (in the format '''yourname@yourrealm''') and password and clilck '''OK'''.. 1. Close all open windows. You are now ready to connect. |
1. {{attachment:securew2_login.png}} Enter your username (in the format '''yourname@yourrealm''') and password and clilck '''OK'''.. 1. Close all open windows. You are now ready to connect. |
| Line 40: | Line 40: |
| {{attachment:graphics44.png}} | {{attachment:securew2_select_eduroam.png}} |
SecureW2
Download the SecureW2 installer from: http://www.securew2.org/products/
Start the SecureW2 installer.
Click Next, and accept the EULA.
Click Install in the options panel. After successful installation the following display appears asking you to reboot:
- Reboot as required. After reboot, the WLAN connection must be configured:
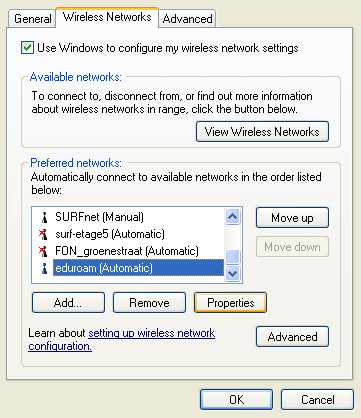
Go to the network properties and right-click on Wireless Networks (where you also choose properties).
Select Wireless Networks and click Add:
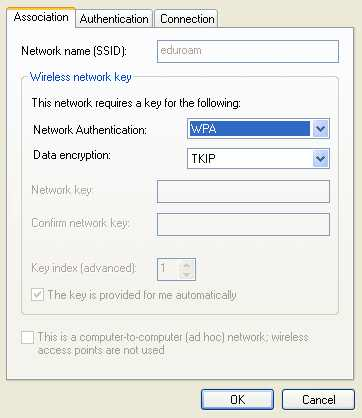
Enter the SSID eduroam and select WPA/TKIP as encryption. Note: If you cannot select this, it is possible that the firmware of your WLAN adapter might need to be updated, and/or you need to install the WPA patch for XP SP2. (Knowledge Base Article 893357).
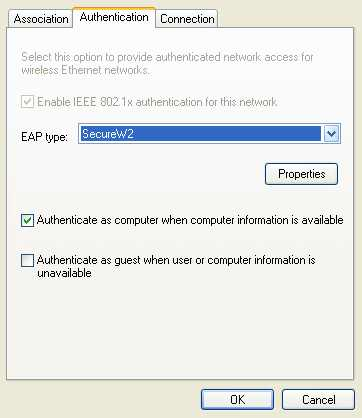
Click the Authentication tab and select SecureW2 as EAP-Type:
Click Properties.
Click New. The following dialog appears:

Select a meaningful profile name (preferably eduroam) and set your outer identity in the form yourname@yourrealm. Note: It is also possible to use anonymous, but the use of outer=inner identity is recommended.
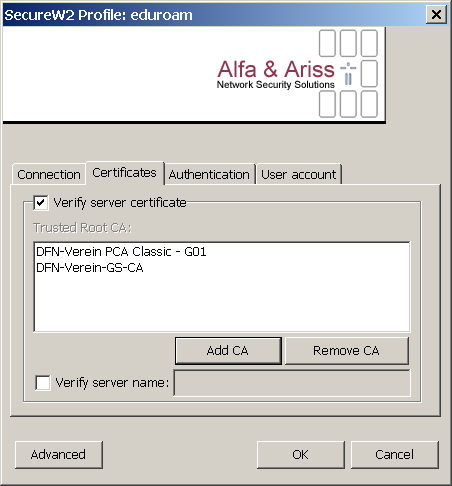
Check the Verify server certificate checkbox and add the certificates from your ca.
Check the Verify server name and add the DNS name of your RADIUS server:
Click the Authentication tab and verify that Authentication Method is set to pap
Click the User account tab:
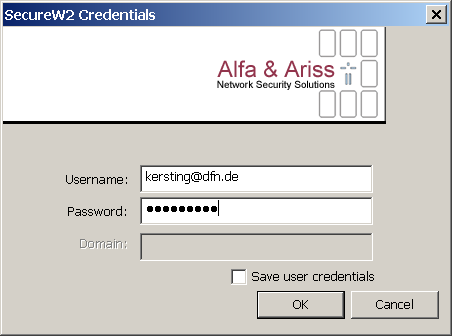 Enter your username (in the format yourname@yourrealm) and password and clilck OK..
 - Close all open windows. You are now ready to connect.
- Click on the WLAN network symbol in the task bar to see all wireless networks in your area:
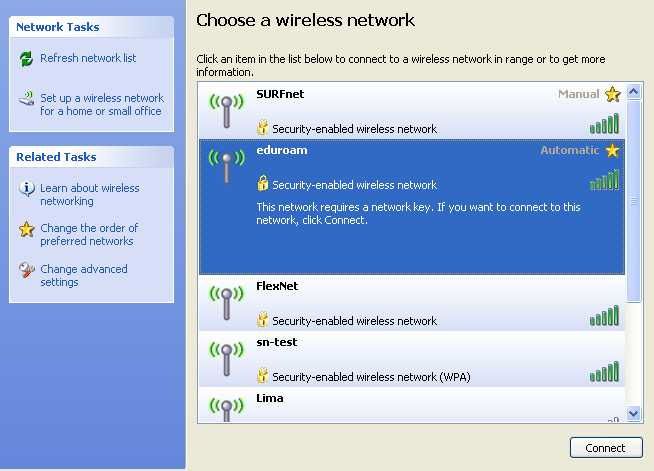
Select eduroam and click Connect.
 Campus IPv6 Wiki
 Supported by GVOP AKF